TABLE OF CONTENTS
- Introduction
- The schedule to upload
- Create a Template where your ILAP Term(s) gets a set of valid values
- Create a Sending Config where your "sending values" are mapped to the valid list
- Create and run an IEA using this sending config
- Modify sending Config to allow any value not in list to be mapped to "E"
Introduction
In this article we want to show a close to "real life" example of how the concept of "Content Control" can be used to prevent "undesired" data from being uploaded.
We will walk through these steps:
1. Set up a list of valid values ("E", "I", and "T") for a particular ILAP Term.
2. Set up a sending config where your "sending values" are mapped to one of these 3 valid values.
3. Create and run an IEA using this sending config and notice behavior.
4. How could we modify the sending Config so that a non valid value automatically uses e.g. "E"?
Prerequisites: Ensure that your Tenant Admin has made the Global ILAP Term you want to use visible to your organization, or that he/she has created a Tenant Specific ILAP Term for your purpose.
Content Control can only be implemented for Sending Configs, since it is at upload that you want to "catch" the validation violations (before the data reaches the receiver schedule).The schedule to upload
We have a custom field (in this case in Safran's uf_ref3 field) that contains the values for "Discipline". We know that we need to end up with the values "E", "I", and "T", and notice here (see red frame in screenshot below) that we have a value "J" that does not match this list.
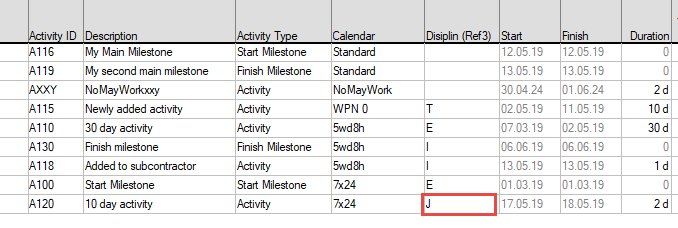
The source schedule to upload after we have applied some value mapping "magic" in ShedEx.
This article will describe step-by-step how we can achieve mapping this "J" to an "I" and ensure that the upload will stop for any values not mapped to one of the 3 valid ones.
Create a Template where your ILAP Term(s) gets a set of valid values
In this example we have created a Template called "Content Control Demo" where we have added the ILAP Term "DisciplineCode" and given 3 valid values for it (by pressing the "+Add new" (red 4) and specifying Value Code and (optionally) Description. Notice that we need to turn on Content control (red 1) in order to specify the list. We have decided to allow blanks (red 2), and also made a choice (at red 3) to Stop the upload if validation fails (instead of just giving warnings in log).
You must first save the newly created Template before you can set up Content Control for any of its ILAP Terms. The form for setting up Content control for an ILAP Term in a Template.
Create a Sending Config where your "sending values" are mapped to the valid list
Create a new sending Config and make sure you mark you ILAP Term as controlled by Value Transformation (making it appear in the "Value Transformation" tab). Then press the "+Add" button to (see red frame in screenshot below):
 Pressing the "+Add"-button opens the form for setting up a value map.
Once "+Add" is pressed, the form for defining the value mapping is seen, and since we want to map both "I" and "J" from the source data to "I", we need to press the "copy row" icon seen on each row:

This is the result after completing the mapping. Notice that "From value" "I" and "J" are now mapped to "I" as "To value".
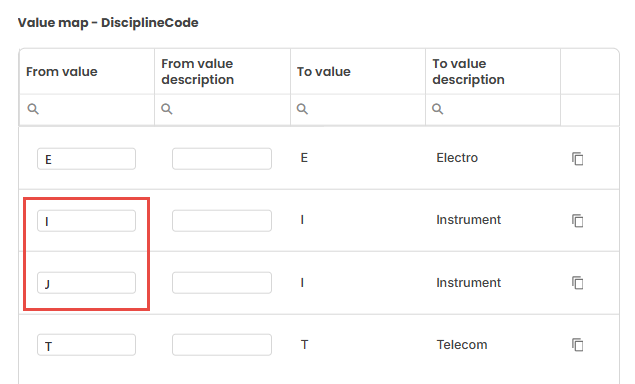
The form for setting up mapping of existing values for a field to the template list of valid values.
The moment you press the "Save" button for this form, a new form will automatically be opened showing the default created formula that does the actual value mapping (2). This formula will later be slightly modified to accommodate an important use case. Notice that you need to select which source field to use for this mapping. In this case "uf_ref3" (1):
 The formula editor will automatically appear after a value map is created in order to let you select the source field to use (1), as well as modifying the formula ((2) - more on this later).
More info on setting up value maps are found here.
Create and run an IEA using this sending config
Create an IEA that uses the created sending Config and set the Frequency to "On Demand".
Then run the upload by selecting "Create transfer event".
 Then execute the transfer (in Desktop or using Autonomous component) to verify that it can run successfully (which it will given the initial schedule).
But let's examine when we introduce a value in "uf_ref3" that is NOT in the list of valid values. What will the error message look like?
We add an "X" for one of the activities:
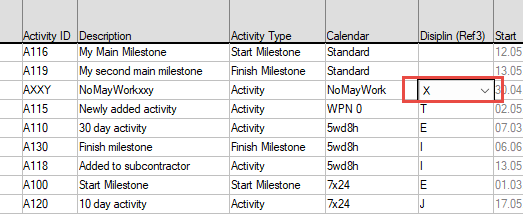
We introduce a "non-valid" value for "uf-ref3" to see how ShedEx responds...
Then running the upload one more time results in this error message in log:

Modify sending Config to allow any value not in list to be mapped to "E"
In the existing example the upload will fail if we punch any value other than "E", "I", "T" and "J" (which is mapped to "I").
We may instead want such a value to be mapped to a specific "default" value (e.g. "E").
This can be easily be achieved by making a minor change to the auto-generated formula.
This was the formula: VM.Map_DisciplineCode_U.Map([VALUE])
This change will achieve the goal: VM.Map_DisciplineCode_U.Map([VALUE], "E")
Was this article helpful?
That’s Great!
Thank you for your feedback
Sorry! We couldn't be helpful
Thank you for your feedback
Feedback sent
We appreciate your effort and will try to fix the article